Sunday, March 8, 2015

Browned Butter Strawberry Banana Bread: Betty, You're Awesome!


 Have you ever thought about Betty Crocker?  Probably not!  If you haven't, you're a practical, right-thinking individual because Betty Crocker isn't even a real person!  She was made up by a an ad agency!  But still, I guess Betty's marketing department is so good, it sure seems like she's a real person to me-- and a really charming one at that!  Even her name sounds like a good friend!  The first cookbook I had was a "kids in the kitchen with Betty Crocker" type publication and I still remember making those recipes.  They were all good, and they all came out just as Betty said they would.  Yes, she was nothing if not reliable!  And somehow encouraging....and fun.....and.....okay, I know that's enough :)
Even though it's cold and only March, there were some very nice strawberries on sale, so I broke out of my must be seasonal snob-ishness (I'm positive Betty is NOT a snob-- she's got her pic on cake mixes for gosh sakes!) and bought them.  I also had a few overripe bananas on hand, so I looked up a recipe for a strawberry banana bread and found this one from "you know who" that used browned butter, too!  Browned butter makes everything better and this recipe is no exception!  It takes just minutes to put together (I included a couple shortcuts and added a few more strawberries and a little less banana.  I'm sure Betty won't care; she looks like she'd be so easy going!), and it tastes SO wonderful!!  Banana-y, but with bits of tart strawberry flavor, this bread tastes great anytime!  Thanks, Betty!
Betty's Browned Butter Strawberry Banana Bread

1/2   cup unsalted butter
1.25 cups sugar
2      large eggs
2      very ripe bananas
1/2   cup buttermilk
1      teaspoon vanilla
2.5   cups all purpose flour
1      teaspoon baking soda
1      teaspoon salt
1.5   cups sliced, ripe strawberries

         Grease the bottom only of a 9"x5" loaf pan with shortening or spray well with PAM.  Preheat the oven to 350F.Put the butter in a small pan.  Melt over medium heat and let the butter bubble until it turns a brownish, golden color.  Stop a tiny bit before it's dark enough because it will continue to darken off the heat.  Be sure not to burn it.  It should smell really good!
Pour the butter in the bowl of a stand mixer.  Add the sugar and beat well.  Add the eggs and beat well.  Break up the bananas into chunks and add to the bowl.  Beat until they are mashed up, then add the buttermilk and vanilla, beating until combined.
Add the dry ingredients and beat until everything is well incorporated, but not too long or the bread will be tough.  Stir in the strawberries.
Bake 1 hour and 10 minutes, or until a toothpick inserted in the middle of the loaf comes out cleanly. Lay a piece of aluminum foil over the loaf if it seems like it's browning too quickly.  Cool the loaf 10 minutes after baking, then run a knife around the edges and invert the bread onto a rack to cool completely before slicing.

I've had some fun making scented, mini-soap party favors for my friend, Julie's, annual luncheon that she hosts for her mother.  Wrapped with a cute notepad, these made lovely little gifts for her guests!


Please take a look at our website www.flownaturals.com to see our selection of handmade, vegan soaps and hand-crafted pottery!  Email us at admin@flownaturals.com for information on custom orders for any occassion!

Thursday, February 5, 2015

Communion Bread: This Do in Remembrance of Me


Our church serves homemade loaves of bread for communion.  Since our church has just passed the 12 year anniversary of its existence, I guess we can't say it's an "age old tradition", but nevertheless, in those 12 years, serving these loaves, made by our members, has become a well-loved tradition.
As one of the bread bakers, it crossed my mind that when new bakers join the team, it might be helpful to have some photos and instructions to go along with the recipe they receive.  My friend, Carol, was visiting last week and took some pictures while I was making the bread for church, so I'm writing this post to help those new to our group!  Thanks and hope this helps you!  What a blessing to participate in this "bread baking ministry"!

Communion Bread (10 loaves)
4.25 cups all-purpose flour
1.25 tsp. salt
2.5 tsp. sugar
2/3 cup olive oil
1.25 cup water
Preheat the oven to 375F.  Line two baking sheets with parchment paper.


In a mixing bowl, combine the flour, sugar, and salt.  

Mix the dry ingredients well.  Combine the olive oil and water in a cup.  Mix well with a fork and add to the dry ingredients with the mixer on low speed.


Mix the dough at low speed until it comes together to form a rather ragged dough that comes away from the sides of the bowl.  You might need to add a tiny bit more flour or water, depending on the humidity of the day.


Now break off 10 pieces of dough, roll them into balls, and place them on the cookie sheets.  You might need to add or subtract to the dough balls to even them out in size.  Just approximate.


Use your fingertips to smush (yes, that's a very technical term reserved only for church bread bakers :) ) the dough down and out into round circles about 5 to 6-inches in diameter.  
Bake the loaves on two racks in the oven for 18 minutes.  Then switch them top to bottom and bake 5 minutes more.  The loaves should be golden-ish.  They won't be brown all over.  Sometimes a bubble forms, but that's okay!


Remove the loaves to a rack to cool completely.  Take to church and be thankful always!

ASB


Saturday, January 31, 2015

Be Mine!  Happy Valentine's Day!

Hi All!
Glad to see you again!  Can you believe it's almost February?  Valentine's Day is just around the corner, so it's time to remember the ones you love whether it's a spouse, a parent, your crazy Aunt Betty or a faithful friend!  Even the most conscientious eaters among us (know any?) enjoy a plate of homemade cookies!  Adapted from a Martha Stewart recipe, these look like the traditional Linzer type, but instead are delicate, flaky, pie-type pastry-- slightly sweet and filled with raspberry jam.  Don't waste the centers, either!  Put them together with melted chocolate for some scrumptious little sweethearts :)

Filled Pastry Hearts


  • 2 1/2 cups all-purpose flour
  • 1/3 cup granulated sugar
  • 1 cup (2 sticks) cold unsalted butter, cut into small pieces
  • 4 tablespoons ice water
  • 3 egg yolks, lightly beaten
  • Jar of raspberry jam
  • Bag of semi-sweet chocolate chips (you won't use them all)
  • Combine the flour and sugar in a food processor.  Add the butter and process until the mixture is combined, but chunks of butter are still visible.  Mix the water and egg yolks together with a fork and add them to the flour / butter mixture.  Pulse together until the mixture comes together-- don't overprocess!
  • Plop the dough out on some plastic wrap.  Squish it together to form a disk and wrap securely.  Refrigerate the dough for an hour or more.
  • Line some cookie sheets with parchment paper.  Preheat the oven to 375F.
  • On a floured pastry cloth (you can use a clean tea towel), roll out 1/2 the dough until it's pretty thin, but not too thin-- about 1/8 inch.  Cut the dough out with a heart-shaped cutter, then cut out a center with a smaller heart cutter and place the cookies on the lined cookie sheets.  Repeat with the other half of the dough, but cut only solid, large hearts.
  • Bake the cookies for about 10-12 minutes, but it depends on how large the cookies are.   Also, the large, solid hearts will take longer to bake.  Bake them until they are golden brown-- don't under bake them.  Allow them to cool on the baking sheets and then remove to wire racks to cool completely.
  • Spread the solid hearts with raspberry (or strawberry) jam.  Press the hearts with the cut out centers on top and press lightly.  
  • Melt some semi-sweet chocolate chips in the microwave and spread half the little hearts with chocolate.  Top with another little heart to make sandwich cookies.
  • Serve to your favorite Valentine(s) !

By the way, if you're looking for something special for that someone special, check-out our men's and women's gifts available at Flow Naturals, our little handmade soap company!

Trio of Men's Soaps in a cool gift box!


Sunday, October 26, 2014

Hi, All!
Wow!  It's been a year since my last post!  Maybe you've been wondering what I've been up to-- maybe not, but I guess I'm going to tell you anyway! :)
I still love cooking and am still actively preparing meals and goodies for family and friends, but I've also gotten into a new thing:  MAKING HANDMADE, NATURAL SOAP !
What?!
Now, you may have visions of a steaming cauldron of caustic cakes (of soap), but natural soaps are actually the exact opposite of that when prepared correctly.  The whole process is very interesting if you like chemistry (?!), and since I used to work in chemistry and taught chemistry, I loved utilizing my background and my desire to be creative to make lovely, luxurious, loving-to-your skin, natural, vegan (plant-based), great-smelling soap!  
A friend of mine that worked with me in the chemical industry is my business partner.  We've had a lot of fun working on developing our interests into a new project.  Now after about a year of research, experimentation, frustrations and "Yay!" moments, we've opened our company!  It's called, Flow Naturals, LLC.  
Please take a look at our website:

www.flownaturals.com

If you read "About Us" and "About Our Soap", you'll see what we had in mind with this whole thing.  Mainly, we want to offer wholesome, healthy, natural products that are good for your skin AND provide a better "soapy experience" than factory produced, non-natural products.
Also, you'll see that we offer a beautiful selection of handmade soap dishes.  These are unique works of art, and most of them are crafted by potters in our area.  We're so excited to have a forum for featuring and supporting local artists!  
Anyway, I hope you'll enjoy taking a look at our website and products!  Thank-you for re-visiting The Friendly Table, too!
IF YOU LIVE IN SAN ANTONIO, TX, AND YOU WANT TO ORDER ANYTHING, PLEASE JUST E-MAIL ME AT

admin@flownaturals.com

We can make arrangements for "pick-up"-- no need to pay shipping :)

ASB


Monday, October 14, 2013

Ruby's Apple Pudding Cake: The 100th Blog Post!


Can you believe it?  This is the 100th post to "The Friendly Table" !  It's true that time flies by when you're having fun!  I've so enjoyed sharing recipes and stories with you and hope that there will be many more (100?!).
I thought and thought about what to do for the 100th post.  At first it sounded fun to do a 100 year old recipe.  After some research, I found some interesting dishes, but in the course of things, I re-discovered my mom's collection of recipes and decided to make something that would honor her.
My mom's name was Ruby.  She told me once she didn't like her name much, but I always did.  Marie, my daughter, tells me it is popular again now days!  Even as a kid, I observed that she appreciated beauty of all sorts: in the home, clothing, the outdoors and gardening.  My dad was a rancher, but they also owned a flower shop and my mom was there almost every day designing and helping people during their proms, weddings, anniversaries, and funerals.   In summer, after working all day at the flower shop, she would rush home and ride around in the truck with my dad while he "set water" for irrigating the fields, admiring the cattle and crops.   I guess this was their time to discuss things and catch up with one another.  When she died, my dad said that was what he missed the most.
Mom was a wonderful cook in the practical, efficient way of a farming/ranching wife.  In the country, there aren't many restaurants, so  going out to eat is not common.  Cooking almost every meal, every day was the norm.  Somehow she got it all done gracefully and deliciously though!  Even after a long, hard day at work, when Mom would come home, she would be happy and excited to start cooking.  It never seemed like a chore!
Her collection is a complete jumble of recipes cut out of magazines and newspapers, written on the backs of envelopes (there are a lot of these!), pages from letters that included a recipe, and typed.  I laughed at the typed ones because I remember her asking me to type recipes out for her when she needed to keep me busy (out of her way).  She would act like there was a very urgent need for a certain recipe and that it would be SO helpful if I would type it out for her on the typewriter.  (Can you believe 1.  I fell for that. and 2.  There was such a thing as a typewriter?) I never did question why she couldn't just use the recipe right out of the newspaper or whatever-- why it needed to be transcribed onto a piece of typing paper.  She could be very convincing :)  
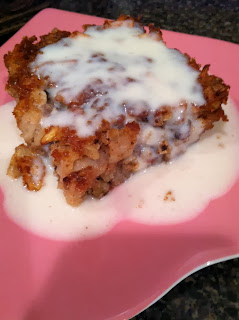
Anyway, it was lovely to go back and look at the collection.  Finally, I came across the recipe I knew I wanted to make:  Apple Pudding Cake, a recipe that was originally from the "Farm Journal", a magazine all the families in our area subscribed to.  My mom used to make this practically every week during the fall and winter.  We lived in a part of Colorado that was known for orchards, so apples were always in abundance during that time of year.  We stored them in a shed and the cold weather kept them edible all winter.  Being a literal type of kid (and kind of "buggy"), I used to bother my mom almost every time she made it because it was called "pudding cake" and it seemed like just a "cake".  My mom was (generally) patient and would tell me the pudding name was for the sauce that was served over the cake.  "So why wouldn't it be called 'Apple Cake with Pudding Sauce'?"  I would counter.  "Because they didn't." was my mom's wise (and tired) reply!
We lived in a very rural area, and in those days other farmers and ranchers used to drop by all the time unannounced in the winter, so every farm wife had to be prepared with coffee and some kind of dessert.  The apple pudding cake was quick and easy to prepare and we always had the ingredients.  Spicy, moist, apple fragrant and topped with a browned-butter sauce, I will always associate this cake with pleasant times at our house.  As a kid, I wasn't too interested in the conversations: the price of cattle, how much hay cost this year, whether the snow was going to result in enough water for the spring, but even back then, it was comforting and homey to hear the voices of my parents' friends, sharing stories around a cup of coffee and this cake-- with the pudding-like sauce!  Ha!  
I hope you'll try this recipe because it's delicious!  After making it again, I think it was called a "pudding cake" because it is so moist that it's almost like a pudding!

Apple Pudding Cake
1/2 cup butter
1 cup sugar
1 egg
1 cup flour
1 tsp. baking soda
1/2 tsp. baking powder
1/2 tsp. cinnamon
1/2 tsp. nutmeg
pinch of salt
*3 medium apples, peeled, cored, and sliced very thinly (We used to sometimes grate the apples, but they are best sliced super thin.)
1/2 cup nuts, coarsely chopped (We always used walnuts, but any are good.)

*Any type of apples will work, but make sure they are juicy and firm.

Preheat the oven to 350F.  Spray a 9x9-inch square pan with PAM.
Cream the butter and sugar well.  Add the egg and beat until fluffy.  Add the flour, soda, baking powder, salt and spices.  Beat on low until somewhat combined.  The mixture will seem dry.  Add the apples and beat on low until all are incorporated.  The mixture will be thick, but moist now.  Stir in the nuts.  
Spread the batter evenly into the baking dish.  Bake for 35-45 minutes, until the center is set and a toothpick comes out clean from the middle.

Allow to cool a bit and serve with the warm sauce:

2 Tbl. butter
2 Tbl. flour
2 cups milk
1/2 tsp. nutmeg
1/2 cup sugar

In a small saucepan, melt the butter and allow it to heat until light brown in color.  Add the flour and stir together.  Add the milk, and stir until the mixture starts to steam.  Add the sugar.  Stir and cook until the mixture boils.  Add the nutmeg.  Allow the sauce to cool to warm.  Pour over each serving of cake.
Serve with coffee or tea and some friendly conversation with family, friends, and / or pets!

Happy fall to you!  
ASB 

Here's the recipe card my mom had in her collection.  It's in my handwriting, and I remember her asking me to write it out for her, even though she had the recipe memorized.  Now, I'm glad she did!


Saturday, September 28, 2013

Mussels on the Grill!

There's a fun little restaurant in San Antonio called La Frite Belgian Bistro.  They have all sorts of delicious, traditional dishes like vol au vent, crepes, and other fancy sounding foods that I understand are actually home-style meals-- at least in Europe!  One dish that Ben and I enjoy there is Moule Frite, a dish of mussels cooked in a flavorful wine-y broth and served with French fries!  Yum!  I never got into dipping the fries in mayonnaise, but I'm told that's traditional.
Anyway, so mussels are a super easy meal to prepare at home!  They are a good source of all kinds of vitamins and minerals, are a sustainable sea food (a farm-raised product), and cook up super fast.  Plus, they taste great!  If you haven't eaten them before, they have a kind of mineral-y, clam-like taste, but sweeter than other bivalves.  Mussels were on sale the other day at our market, so I thought it might be fun to try cooking them outside on the grill-- you know, less Belgium, more Texas :)
Well, this was the BEST dish of mussels I've ever made!  The broth was slightly smokey and the mussels cooked up very tender and sweet.  Served with sweet potato fries (although regular fries are ALWAYS good!), this was a different, delicious twist on an already terrific dish!

Mussels on the Grill (2 entree sized portions)
2 lbs. fresh mussels 
2 Tbl. olive oil
2 strips bacon, cut into 1-inch pieces
2 cloves garlic, sliced
1-1.5 cups vegetable broth (I like Trader Joe's organic)
salt
pepper
chopped parsley or chives
Cast iron skillet (or another type that can go directly on an outdoor grill)

Nowdays, farm-raised mussels have been cleaned quite well.  Still, check them all very carefully to make sure they are still alive.  Each mussel should feel heavy and be tightly closed.  When you tap on it, it shouldn't sound hollow.  If a mussel is open, tap on the shell.  If it closes, the mussel is good, but if it doesn't, then throw it away.
Wash the mussels in a colander under running water to remove any sand or grit.  Remove any black stringy things that might be hanging from the mussels.  Those are called the "beard" and help the mussel anchor itself to rocks, etc.  
Put the skillet over hot coals.  Add the olive oil, bacon, and garlic.  Cook until the bacon is looking crisp.  Add the vegetable broth, salt and pepper and heat until boiling.
Now add the mussels all at once.  Stir gently.  Cover the grill and cook the mussels for 5 minutes.  They should be open and look very dramatic :)  Bring the skillet to the table and sprinkle the chives over.  Ladle the mussels and broth into bowls.  Throw away any mussels that didn't open.
Serve with sweet potato (or regular) fries and crusty bread to soak up the delicious broth!
Bon appetit, ya'll!


P.S.  My next entry will be my 100th post!  What should I do?  


Friday, September 20, 2013

Pork Picadillo Tacos


Do you ever use ground pork?  Sometimes I buy it to mix with ground beef and ground veal to make meatballs or meatloaf, and it's the protein of choice for Chinese dumplings, but it's also really tasty in Mexican dishes!  Now days you can buy very lean ground pork and it's economical also.  I like to use it as a change to ground beef or ground turkey.  The flavor is very mild, so it takes well to lots of spices and herbs.
This pork picadillo taco filling is super easy and comes together in one pan.  Serve it in soft, whole wheat or crispy, corn tortillas, or put it over tortilla chips as the beginning of delicious nachos!
This is an quick, simple recipe.  The secret to it's delicious-ness is to allow everything to brown well at the beginning!

Pork Picadillo Tacos (makes 6 generous tacos)
1-1.5 lb. lean ground pork (or turkey)
1 rather large jalapeno pepper, chopped (keep the seeds if you want it super spicy!)
2 roma tomatoes, chopped
1 large clove garlic, sliced thinly
6 medium sized mushrooms, chopped coarsely
2 Tbl. sliced almonds
1 Tbl. golden raisins (regular are fine)
1 Tbl. olive oil
1/2 tsp. salt 
Baby greens
tortillas

In a large skillet, heat the olive oil.  Add the pork, mushrooms, garlic, and almonds, stirring to break up the pork.  After it's broken up, let it cook without stirring much, to let things brown nicely. 
Add the tomatoes, jalapeno and raisins.  Stir and cook about 3 minutes.  Add the salt and about 1/2 cup water.  Let the mixture cook down until the water is almost evaporated.  Taste for seasoning.
Heat the tortillas in the oven a few minutes.  Place a few baby greens on a tortilla and top with some picadillo.  Fold over and eat!  Repeat!