Wednesday, November 28, 2012

Salted Foccacia Bread-- More Fun with Yeast!

 Hello, Everyone!  Hope you all had a terrific Thanksgiving with lots of family, friends, and food!  Isn't Thanksgiving great?  It's a holiday set aside to give thanks for every blessing around a table of dishes everyone looks forward to all year!  Now, that's a good day!  Of course, any holiday that involves people (which is most of them!) isn't going to be perfect, but still, it's hard to be grumpy when your plate is heaped up with mashed potatoes!
Anyway, I know my last post was a yeast recipe, but I'm having fun these cooler days with homemade breads.  Here's a recipe I developed for salted foccacia bread that is easy and makes three loaves.  They freeze really well.  Now, here's the thing, a loaf of homemade bread makes any meal a LOT better, so when you're busy with all the activities of the holiday season and dinner is soup from a can-- whoa!-- you have a loaf of homemade foccacia in the freezer!  Just heat and serve--you've got it SO together! You're Super Chef!

Salted Foccacia Bread
Flour (about 4 cups, but you can figure that out later)
2 pkg. active dry yeast (I like the "Rapid Rise" kind)
1/2 cup olive oil, plus more for drizzling later
1 Tbl. salt, plus more for sprinkling later
3 cups warm water (test with a drop on the inside of your wrist-- you shouldn't feel anything or just barely warm)
1 Tbl. sugar
Spray 3,  9-inch cake pans with PAM.  Set aside.
In the bowl of a stand mixer with the paddle attachment, mix the warm water, yeast, oil, and sugar well. Go away for 15 minutes.  When you return, there should be lots of bubbles on the surface of the liquid.  Add about 2 cups flour and mix until smooth.  Add the salt and mix again.  Now keep the mixer on low speed and add flour until you get a very soft, sticky, stretchy dough.  It might take another cup or more.  A lot depends on the humidity, but just make sure you don't add too much flour.  A wet, sticky dough is best-- like it would barely hold it's shape if dumped out of the bowl.  Don't fret about whether the dough is the exactly right consistency.  Later, once you douse the whole thing in olive oil, all "problems" will vanish-- I promise!  Keep mixing the dough on low until it is smooth.  It will be extremely stretchy.  Remove the bowl, spray the top of the dough with a light coating of PAM, and cover with a piece of Saran wrap and then a tea towel.  Place in a warm place (at least 75F if possible) and allow to rise about 1 hour.  
After an hour, check the dough.  It should have risen to the top of the bowl.  If not, allow to rise a bit longer.  Remove the plastic wrap and stir down the dough with a wooden spoon that has been sprayed with PAM (dough doesn't stick so badly that way).  Put olive oil on your clean palms and separate three blobs of dough into the prepared cake pans.  Don't worry if they are super rough looking, but try to get about the same size blob into each pan.  Cover the pans with the tea towel and allow to rise again about 20-30 minutes.  Preheat the oven to 375F.
Now comes the fun part!  Put olive oil on your clean hands again and use your fingers to punch depressions all over the surface of the loaves.  Use a tablespoon to drizzle generous amounts of olive oil over each loaf.  I use about 1-2 tablespoons per loaf; be generous-- it's pretty hard to get too much!  Use your fingers to lightly rub the oil over the surface of the loaves.  Sprinkle each loaf with salt-- coarse Kosher salt is good if you have it, but sea salt is good also.  Bake the loaves for about 30 minutes, until they are brown and beautiful!  Eat right away or cool completely, wrap well in aluminum foil and freeze.  
To reheat, unwrap and heat in the oven for about 20 minutes at 350F.
Too many bread posts?  Okay, okay, next post will be a super easy chicken Parmesan-- goes great with the foccacia bread! :)
ASB


Monday, November 19, 2012

Thanksgiving Day Breakfast-- Homemade Cinnamon Rolls


Okay, I have a LOT of stuff to get done for Thanksgiving, but I'm taking a break to tell you all that the cinnamon rolls recipe from "The Pioneer Woman Cooks" cookbook by Ree Drummond really are worth making for your Thanksgiving Day breakfast!!  They are easy and come together pretty quickly for homemade rolls.  Also, they use yeast AND baking soda AND baking powder, so don't worry, they are going to rise!  The icing is wonderful-- maple and coffee flavored!  Ms. Drummond says they can be frozen already iced and then warmed in the oven for 15 minutes.  This is a very useful thing when the oven is going to be busy all day!
I changed a few things, and there are a few things to note about my experience with the recipe.  Instead of brewed coffee for the icing, I used expresso powder to make the amount of coffee I needed.  Somewhere in the past I read that when using coffee as an ingredient, it's better to make it from expresso powder because it keeps the flavor better in the finished product.  You can find it at any grocery store and it's inexpensive.  Also, I used only 1/2 cup melted butter inside the rolls, then drizzled the other 1/2 cup over the cut surfaces of the rolls once they were in the baking pans.  The recipe says to use the whole 1 cup inside, but so much would run out onto the counter it seemed like a waste.  This way, you keep all the butter where it belongs-- with the cinnamon rolls!  I made 1/2 the recipe because even that made 20 cinnamon rolls, which are plenty if you don't have a bunch of ranch hands to feed along with your family like Ree Drummond!  Lastly, I mixed a portion of the cinnamon into the dough itself because my son-in-law, Miles, said this is a "must have" feature of the proper cinnamon roll.  I agree!  Don't worry if the dough seems really soft.  I thought it would be a problem, but they turned out great and the soft dough absorbs all the butter and icing even better!
Well, I'd like to visit all evening, but hey-- I'm busy here!  So, this is the recipe with my changes--oh, and Happy Thanksgiving!

Cinnamon Rolls (adapted from the "Pioneer Woman Cooks")
Dough:
2 cups whole milk
1/2 cup vegetable oil
1/2 cup sugar
1 package active dry yeast (I used the "Rapid Rise" type)
4.5 cups white flour
1/2 heaping tsp. baking powder
1/2 tsp. baking soda
1.5 tsp. salt
2 tsp. ground cinnamon
Filling:
1 cup melted butter
1 Tbl. + 1 tsp. ground cinnamon mixed with 1 cup sugar
Icing:
1 pound powdered sugar
1/2 cup whole milk
3 Tbl. melted butter
1 tsp. expresso powder dissolved in 2 Tbl. boiling water
Dash of salt
1.5 tsp. maple flavoring

Spray 4, 9x9 square disposable aluminum pans or regular baking pans (I don't have that many!) with PAM. Heat the milk, oil, and sugar in the microwave for 1.5 minutes, or until just barely warm.  Stir to dissolve the sugar.  Pour into the bowl of a stand mixer with the paddle attachment.  Sprinkle the yeast in and stir to dissolve.  Go away for 10 minutes.  There should be lots of bubbles on the surface of the mixture.  (These instructions are also a little different from the cookbook, but it works better for me-- so maybe it will for you also!)
Add 4 cups of flour and stir to combine, but leave it lumpy and rather rough looking.  Don't overmix.  Cover with a clean tea towel and set in a warm place for 1 hour.
The dough should be risen about double now.  Put the bowl back on the mixer.  Add the baking powder, baking soda, salt, 2 tsp. cinnamon, and 1/2 cup flour.  Stir thoroughly, making sure everything is mixed in well.  Let the dough rest about 10 minutes.
Get a large, clean tea towel and put it on the counter.  Sprinkle flour all over the towel.  Dump out the dough (it will be soft) and roll it to a big rectangle about 10 x 30 inches.  Pour 1/2 cup melted butter on the surface using your fingers to spread it all over.  Sprinkle the cinnamon sugar over the surface.  From the short end, roll the dough, lifting the edge of the tea towel to help you roll it up as evenly and tightly as you can.  
Using a sawing motion, cut the dough into 20 slices using a floured, serrated knife.  Place them cut side up into the prepared pans.  I fit 5 per pan.  Drizzle the remaining 1/2 cup melted butter over the cut surfaces of the rolls.  Cover them with a towel and let rise 20-30 minutes.
Heat the oven to 375F.
Bake the rolls for 13-17 minutes, until golden brown.  
Mix all the icing ingredients with a whisk and pour / spread all over the rolls while they are hot.  
If you're going to freeze them, allow to cool, wrap well with aluminum foil and freeze.  Yay!  


Saturday, November 10, 2012

Can She Bake a Cherry Pie?

 
Have you ever heard that folksong.....something something, "Billy Boy, Billy Boy" ?  At some point the singer asks "Charming Billy" whether his new wife can bake a cherry pie.  He says, "She can bake a cherry pie quick as a cat can wink his eye!  She's a young thing and cannot leave her mother."  Evidently, as long as his new wife could bake a cherry pie quickly, it was fine with him if she lived with her mother.  I don't know anyone that likes cherry pie that much, but I do know that for some reason, a lot of men like cherry pie-- at least the ones I know!  It is definitely one of Ben's favorites!
Here's the thing about cherry pie:  some people won't even touch one unless it's made completely from scratch, and some people like only the kind made with canned pie filling.  There's no middle ground here that I can tell.  I think, like a lot of things, it's a product of your childhood.  If you grew up with a mom that liked to cook and maybe in the country where fruit was either fresh or home canned, then you probably are a hold out for the "from scratch" pie.  BUT, if you grew up loving those packaged fried pies that were sold at every 7-11 type store around the country, then nothing beats that thickened, sweet, bright red stuff!  We like what we like!
If you haven't joined either side yet, or you like the "from scratch" type of pie, then try this recipe.  As far as fruit pies go, cherry is one of the easiest and most reliable.  If you don't make pie crust (another blog!), the ready made kinds are good, or the boxed pie crust mixes are fine.  As we say in yoga, "No judgments!"  Ha!
Cherry Pie
Pastry for a two-crust pie
2 cans tart cherries, packed in water
3 Tbl. cornstarch
1 cup sugar
1/2 tsp. almond extract
1 Tbl. butter
few drops red food coloring (this can ease the pain for the canned filling fans, but it's optional, of course!)
Line an 8-inch pie plate with pastry.  Preheat the oven to 425F. 
Drain the cherries, reserving one cup cherry juice.  Put the sugar and cornstarch in a saucepan and stir to mix well.  Add the cherry juice.  Cook and stir over medium-high heat until the mixture bubbles and thickens.  It will be translucent.  Take off the heat and add the butter and flavoring.  Mix well.  Add the food coloring if using.  Stir in the drained cherries.
Roll out the rest of the pastry and cut strips (a bit over 1/2 inch or so wide).  Pour the cherry filling into the pie plate and top with the pastry strips to make a lattice pattern.   There is a procedure for making a real, woven lattice top, but it doesn't seem like a good use of time to me!  I just go across and across the other way.  No one's said anything so far!  (Maybe people are keeping their complaints to themselves-- aren't they nice?!  Choose friends carefully!)  Go around the edge of the pie with a fork, pressing down to seal the two crusts together well.  Sprinkle the top with sugar if you want.
Put the pie on a foil lined cookie sheet (It will probably bubble over, and this saves you a mess in the oven.).  Bake for 10 minutes.  Reduce the heat to 350F and continue baking for 45-50 minutes, until browned and bubbling.  Allow to cool before slicing.
ASB
This recipe makes 4 cute mini-cherry pies also!


Saturday, November 3, 2012

Easy Little Cookies!

 
I had some fun today making meringues!  They are easy, take few ingredients, and are delicious!  They also happen to be fat free!  Of course, there is the sugar............well, it's a cookie for gosh sakes! ;)
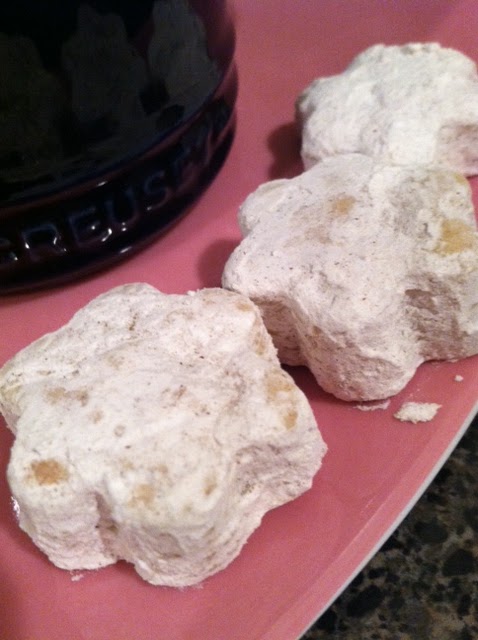
Also, if you saw my previous post about Mexican food, I included a picture of these shortbread cookies and wanted to give you all the recipe for those.  These are such cute little bites, made with shortening instead of butter, but still super delicious with the powdered sugar, cinnamon, and cardamom coating!  Without the powdered sugar, these cookies freeze well.  You can just dust them before serving.  They go perfectly with a cup of coffee! 
Both of these cookies take very few ingredients and just a few minutes to pop in the oven.  The meringues have to bake awhile, but that's just work for the oven!  They are flavored with vanilla and contain chocolate mint chips.  I tinted them green just to make them pretty and "minty", but of course, that's optional.  Meringues are great to make when you want to use up extra egg whites.  I store egg whites in the freezer, then  when I have a lot, I usually make an angel food cake. Now though, I might start making meringues instead! 
Note:  If you live in a humid climate, make meringues on a cool, dry day.  That way they will stay crisp if stored in an airtight container.  They don't stay fresh more than a couple days though, so you have to eat them up!  Oh, well!
MEXICAN SHORTBREAD COOKIES
1 lb. flour (about 3.5 cups)
1 cup, plus 2 Tbl. shortening (not butter-- makes a difference)
1 cup sugar
1/3 cup rum (dark or light)
2 cups powdered sugar
2 tsp. ground cinnamon
2 tsp. ground cardamom
Line some cookie sheets with parchment paper and heat the oven to 350F.
In a stand mixer, mix the flour, sugar, and shortening together.  Add the rum.  The dough will be stiff, but should stick together.  If it's dry, add more rum or water.
Gather the dough into a flat disk, pressing it altogether.   Roll the dough to a thickness of 1/2 inch on a clean, floured tea towel.  A piece of plastic wrap over the top of the dough helps it to roll out without sticking.  Remove the plastic, and cut the dough into shapes with small cookie cutters (ones about 1.5 inch diameter are best).  Place on cookie sheets about 1-inch apart and bake for 12-15 minutes.  Don't underbake.  They take awhile because they're rather thick. 
Allow to cool, then toss the cookies around in a zip lock bag filled with the powdered sugar, cinnamon, and cardamom.  Remove and serve!
CHOCOLATE MINT MERINGUE COOKIES
2 egg whites
pinch of cream of tartar
1 cup sugar
1/2 tsp. vanilla
5-6 oz. mint chocolate chips (I use Andes Mint Chips)
green food coloring (optional)
Heat the oven to 200F and line 2 cookie sheets with parchment paper. 
In a stand mixer, beat the egg whites and cream of tartar together until pretty stiff.  Add the sugar then, a bit at a time, and continue beating into very stiff peaks.  Beat in the vanilla and green food coloring until you like the color.  Rub a little of the meringue between your fingers.  You should not feel any of the grainy sugar.  If you do, keep beating until you don't.
Fold in the chips.  Using two tablespoons, drop dollops of meringue on the prepared cookie sheets.  The dollops can be fairly close together; they don't spread.  Bake both sheets at one time for 1 hour, or until the cookies are completely dry and crisp. 
Store in an airtight container.


Cheesy Potatoes

 Although they're out of favor with some anti-carb nutritionists, I love potatoes!  My uncle grew them on his farm in Colorado and we were never without the round, red-skinned type that thrived in that climate.  One year Easter came early and their store of farm potatoes was gone.  When my mom said she would make the scalloped potatoes for Easter dinner, my aunt was incredulous, "You still have potatoes?!" she inquired?  "There are grocery stores!" was my mom's exasperated reply, but I had to laugh because I knew no way was my auntie going to trust anyone's potatoes except the ones THEY grew!  I'm not sure if she ate the scalloped potatoes that Easter or not, but I doubt it!
Anyway, I came up with this recipe for Cheesy Potatoes one weeknight when I wanted to serve a yummy side dish, but didn't have time for the long cooking required for scalloped potatoes.  They have a hint of garlic to them also, which really adds to their flavor.  The recipe can be doubled easily, and they even taste good reheated!  
If you don't have Colorado potatoes for this recipe, it will still be edible :) And if you don't have potatoes, well, there are grocery stores!  HA!

CHEESY POTATOES (serves 4 as a side dish)
4 medium potatoes (red-skinned, Yukon gold, or even russets will do)
1 clove garlic (smash on a cutting board with the flat side of a Chef's knife, the skin comes right off)
1.5 cups grated sharp cheddar cheese
2 Tbl. flour
2 Tbl. butter
1.5 cups milk
salt and pepper
1 qt. casserole dish, sprayed with PAM or buttered (better!)

Oven at 350F.
Peel the potatoes and slice about 1/4 inch thick.  Put in a pot and cover with cold water.  Throw in the smashed garlic.  Add about 2 tsp. salt to the water.  Boil the potato slices until they are just tender, about 10-15 minutes.  Try to not get them overdone, but if you do, don't worry about it!
Drain the potatoes and garlic in a colander.  Set aside.  
Melt the 2 Tbl. butter in the same pot and then add the flour.  Stir around until it gets bubbly, but be careful not to burn the mixture.  Off heat, stir in the milk.  Cook and stir over medium-high heat until the sauce gets smooth and thick.  Remove from heat.  Add about 1/2 of the cheese to the sauce and stir.  Add salt and pepper to taste.  
Put the potatoes and garlic back in the pot and stir carefully to coat with the cheese sauce.  Pour into the casserole dish.
Bake for 20-25 minutes, until hot and bubbly.  Allow to sit about 5 minutes before serving.
Yummy!

Note:  Doubled, or even tripled, this is a good recipe for a potluck because it stays hot for a long time.  Increase the baking time about 15 minutes if you double the recipe.


Sunday, October 28, 2012

Mexican Chicken and Spinach Casserole


Here in San Antonio, Texas, we love our Tex-Mex.  Mostly, we don't concern ourselves with what is "authentic, regional Mexican cuisine" and what is something Mexican Americans (or cowboys) developed later.  We like what we like!
Sometimes though, despite ourselves, we get an education regarding the varied and wonderful dishes that really are native to Mexico.  In the '90s, there was a revival of interest in Frida Kahlo, painter and wife of Mexican artist Diego Rivera.  "Everything Frida" was pretty trendy in those days, so of course, there had to be a cookbook!  Written by her stepdaughter, it had beautiful pictures of the dishes and interesting essays on the artists' lives.  I bought it mostly because the stories were interesting, but it turned out to be one of my favorite cookbooks, and I've made quite a few dishes and did learn a few things about "real" Mexican food-- mostly that it's really tasty!
This casserole has lots of spinach and is fairly light.  I streamlined it a bit from the original recipe, changed some proportions (I think something was lost in the translation from metric to English measurement!), and added the chicken, which I think is very tasty with the spinach sauce and chile.  The chile flavor is subtle, but adds a lot of interest! If you don't have a food processor, you can process the sauce in a blender.  Pour in some of the cream sauce and it will all blend up beautifully!
P.S.  Like the paper flowers?  I'm making them now!  Ole! :)

Mexican Chicken and Spinach Casserole

About 2 cups cooked chicken (leftovers are good, OR shred up part of a rotisserie chicken OR simmer a couple chicken breasts in salted water for about 20 minutes)
12 oz. frozen spinach
1 serrano chile
2 T. butter
2 T. flour
1 cup milk
1/4 cup cream
8 oz. penne pasta or elbow macaroni
1/4 cup Parmesan cheese
Salt and pepper

Spray with PAM or butter a 2 qt. casserole.  Preheat the oven to 350F.
Boil the pasta according to the package directions in salted water.  Drain well, rinse under cold water, and set aside.
Cook the spinach in the microwave for about 3-4 minutes.  It should be hot and completely thawed.
Squeeze out most, but not all of the moisture from the spinach.  It doesn't have to be super dry.
Chop the serrano chile coarsely.  Use the seeds if you like a spicy dish, or remove them for a milder one.
Mix the spinach and chile in a food processor until chopped finely.
Melt the butter in the pot you cooked the pasta in.  Add the flour and cook briefly, stirring.  Add the milk, cream, and salt and pepper to taste.  Cook and stir with a whisk until thickened and smooth.  Stir in the spinach / chile mix.  Taste to see if you need to add more salt and/or pepper.  T
Add the pasta and chicken and mix thoroughly and turn into the baking dish.  Sprinkle with Parmesan cheese.
Bake for 25-30 minutes, until bubbly and browned.


These Mexican shortbread cookies are fun to make!  Another post coming soon! :)

Sunday, October 21, 2012

Memories of Meyer Lemons and More!

Before I talk about Meyer lemons, I wanted to let you all know about another super cute blog, "Little Kitchie" !  It's written by Marie, my daughter.  You might have read her guest blog post here a while back.  Her first post is for the most scrumptious looking black pepper and gruyere popovers!  Here's the link:
http://littlekitchie.blogspot.com/  
Marie and I like to exchange recipes and she thought this would be a fun way to do that and to share with you all as well!  I agree!  
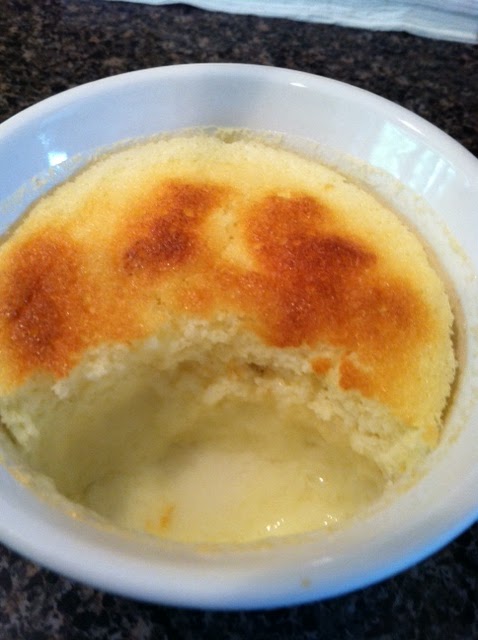
Well, nowdays Meyer lemons are everywhere, but these lemon-orange hybrids used to be mostly a California, regional fruit.  As a child, I lived in southern California and my mom and dad owned and operated a nursery.  We lived on the property, and I have so many fun memories of playing among all the plants with my cousins.  Easy to grow, prolific and fragrant, my parents sold a lot of Meyer lemon trees, and it was really quite awhile before I knew lemons did not generally mean Meyer lemons!  One whiff of that lovely, floral frangrance definitely takes me back to those days in Garden Grove when there were still strawberry fields and orange groves among the growing subdivisions. A few days ago, my friend, Julie, called and she was making Meyer lemon pudding cakes.  Just hearing that name made me a little nostalgic.  Then yesterday at the Farmer's Market, there they were and on sale for a great price!  Since imitation is the most sincere form of flattery (right, Julie? :) ), I decided to make Meyer lemon pudding cakes too!  These luscious little desserts are so fun to make!  They bake up with a tender, moist, spongey cake on top and a creamy, citrus-y flavored pudding on the bottom-- magic!  They are wonderful served warm or cold.  If served warm, they are cozy and comforting.  If served cold, they are refreshing and bright.  It's a win-win!  One warning though:  they "go down easy" and before you know it, you're finished and are thinking you certainly could eat another one!  Ben ate THREE of these in less than a 12-hour period.  Uh-oh, it might be awhile before I can make these again, but I'm sure your family has more will power :)
NOTE:  This recipe can be made with regular lemons also.  If you do, they are every bit as delicious!  Use 1 more tablespoon of sugar than called for in this recipe though.  

Meyer Lemon Pudding Cakes
2 Tbl. butter
1/3 cup sugar
2 eggs, separated
3 Tbl. flour
1.75 cups milk
1/4 cup Meyer lemon juice
1 Tbl. grated Meyer lemon peel

1.  Preheat oven to 350F.  Set a kettle of water on medium heat.  Get out a 13"x9" pan and set 6, 6oz. ramekins in the pan.  You can also make this recipe in an 8x8-inch baking dish.
2.  In a large bowl, beat the butter and sugar together well.  Beat in the egg yolks until blended.
3.  Add the flour and blend well; then add milk and juice.
4.  Beat the egg whites until soft peaks form when you lift the beaters. 
5.  Fold the egg whites into the lemon mixture using a large rubber spatula.  Fold in the lemon peel.  Don't over mix; the mixture will appear mostly smooth with a few small lumps.
6.  Pour the mixture into the ramekins or baking dish.  By now the kettle should have boiling (or very hot) water in it.  Pour water into the 13x9 dish, all around the ramekins to a depth of about 1 inch.
7.  Carefully, put the pan in the oven and bake the ramekins for 25-30 minutes, or the 8x8 dish for 40-45 minutes.  A knife inserted in the center should come out clean when they are done.
8.  Remove carefully from the water and let stand at least 15 minutes before serving.  Or cool and refrigerate to serve cold.
Right before serving, you can sprinkle them with powdered sugar or not-- they taste wonderful either way!
Refrigerate any leftovers-- a yummy midnight snack-- ask Ben :)
ASB